Showing posts with label sewing. Show all posts

Monday, December 6, 2010

Whoopsie!

I didn’t mean to fall off the face of the planet, it just happened. Among other things, I recently purchased my first Mac, and I haven't quite got the hang of iPhoto yet. Photographic proof of some of the things I've finished up recently:

I've got quite the backlog to show you, starting with my Rocky Mountain Sunshine Afghan.

Please see my Ravelry project page for more information on the specifics. I adore it. Love it beyond all reason. Would save it from a burning building. The yarn is delicious (Michigan-based Shepherd's Wool) and the colors are perfect. I think the red edging really helps to bring it all together and keep it feeling fresh and modern.

My dad had a birthday, and I made him some socks. He adores his handknit socks. Frequently when I call him, he'll find a way to work into the conversation that he's wearing socks I made him. He has a serious attachment to these pair from a while back, so I figured it was time he got a new pair.

These are the Gentleman's Half Hose from Knitting Vintage Socks by Nancy Bush. This book is my absolute favorite source for socks in general and men's socks in particular. I used Lang Jawoll superwash with size 0 needles. They were excellently received and immediately modeled by my dad. Knitting men's socks can be quite the slog - their feet are just so big! - and I find I never know for sure if they're going to fit properly. These are perfect.

My sister-in-law also had a birthday. I decided to make good use of the the fabric scraps I've been collecting at an enormous rate since I got my machine last year and make a patchwork scarf. And then I decided that I loved the end result so much that I made one for myself! These patchwork scarves sew up in an evening, with very little thought required.

I apologize for the blurry photo, and for the sans-makeup-Sunday-is-for-homework look I'm sporting.

Anyway, the only materials I bought for this project were 1.5 yards of quilting flannel in that putty grey that is so popular right now. I used it for the backing. While I don't love the color in general, I wanted a flannel back for snuggliness and I wanted something that would go with the overall color scheme (black, white, light grey, yellow, purple, red) without matching anything in particular. If you're looking to do something similar, just Google "patchwork scarf" to see what I used as inspiration. I interspersed long strips and short strips, laying them out in a manner that pleased me. I pieced the scraps with 1/4 inch seams and sewed the front and back right sides together with 1/2 inch seams. Then I just clipped the corners, turned, pressed, and topstitched. The flannel yardage I bought was enough for 2 scarves with a seam in the middle of the length. The scarf is 8 inches wide and about 84 inches long. It is long enough to wrap once and have long ends or to double and pull the end through, if that's your preferred method. I really like that the fabric has enough body to stand on its own in front of your mouth and nose so you can really snuggle down in the face of winter wind. Also, it takes a lot fewer scraps than you might imagine, so if you're looking for a quick and cheap holiday gift, you could consider this.

In other news, I spilled 16oz of hot coffee on myself on Friday in front of (among others) a certain male that I am crushing. All 16oz of coffee. I was wearing my Ravelympic vest. The whole situation was very Meg Cabot, and definitely the sort of thing that happens to me more often than not. Luckily, the vest has a lot of patterning, so the fact that I wasn’t able to remove all of the coffee is not noticeable to anyone but me.

My ego, sadly, has not recovered.

Sunday, October 10, 2010

Professional

I've been dreaming about a red corduroy skirt since last winter. Don't ask me why. I just wanted one. I never really got around to it last year - I wasn't sure what kind of shape I wanted on the skirt, and it needed to have pockets and waistband, and I hadn't found the Right Pattern. Then it occurred to me that I had a pattern I liked. I didn't like everything, but I liked the basic things. That pattern was New Look 6873, otherwise known as the Lemon Skirt. I liked the substantial waistband and the pockets. I liked the length (which I had also altered from the pattern on the Lemon Skirt). I didn't like how severely triangular the shape was, and the skirt was a bit big. Not so big I couldn't wear it, but big enough to migrate during the course of wearing so I might find my pocket located closer to my belly button than previously imagined. So, I redrafted the pattern.

First, I traced the existing front and back pieces on to paper. Then, I added two inches in length and took off two inches at the side seams from the hem of the skirt, removing 8 inches total circumference from the skirt. I blended that line up to nothing at the waist. I added less room at the fold when I cut out (recall that I graded the pattern up for the Lemon Skirt. This red skirt is something like a size 19.) I didn't do anything to alter the pockets. I sewed them from the original pattern pieces, and when it came time to attach things I lined up my notches and whatnot, cutting the side seams flush by hand.

I really like this incarnation of the pattern, and I'm already considering new directions for it. I don't, strictly speaking, have a lot of use for this skirt at the moment, but I have worn it to various client meetings and workshops. It never fails to make me feel confident and a bit smug. The picture is an example of an outfit from a real live workshop earlier this week. I also made the teal shirt under the cardi. It was my first go with knits, and more successful than I had hoped, but still a learning experience. The pattern is from New Look 6569. It's not so successful that I feel comfortable modeling without something over it, however, so you'll just have to take my word for it.

In other news, I finished up my granny squares and am now sewing them together. It's starting to look like a blanket, and I adore it more with each new row.

Wednesday, August 25, 2010

One Stone

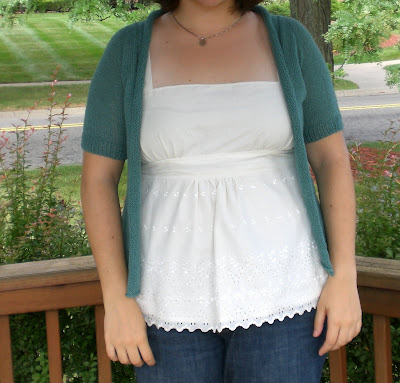
This is a post about two of the three pieces of clothing I am wearing between my waist and my collarbones. And it is not about the thing that I am wearing which you can't see. So that narrows it down.

Both of these things have been done for a long time. The sweater was finished in June, and the top in July. It took me until a few days ago to block the sweater. Wow. I just admitted my gross negligence in a public place. I need a minute to recover.

The stats:
The sweater is Hannah Fettig's Featherweight Cardigan knit with US 4 needles (I think. It's been a long time since I finished!) and in Valley Yarns 2 14 Alpaca Silk. The top is New Look 6774 shortened to be a top and made from fully lined cream colored eyelet.

The modifications:
In the sweater, I moved the raglan lines in towards the top of the arm by 2 stitches on each side and cast on more stitches at the underarms. I have trouble with top-down sweaters fitting properly, being a woman of a large-ish chest. By the time the body circumference is right, the armholes are way to long and the arms are huge. There was a recently released updated pattern for this sweater which I believe does something similar, though I knit mine from the old pattern and have not read the new one. I shortened the arms to a kind of middle short-sleeved length just above the elbows, and I lengthened the body by a lot.

For the top, get ready for an in depth few paragraphs. This pattern is actually a dress pattern, but I have this love for eyelet which I couldn't put off. I was originally thinking to do the lining on the Lemon Skirt in eyelet and have it peek out under the hem, but that plan fell through so I decided to shorten the dress to make a top similar to a few others which I have in my closet. I measured one of the existing tops to get the length of the body right since this is an eyelet edged fabric and there was going to be no hem. For me this was 12 inches.
The modifications were many, and if I was going to do it again, I would do a lot of re-drafting of the pattern to get it right. I moved the front of the straps about an inch towards the center. Basically, I tried on the top with a bra and made it so the straps would cover the bra straps. I have to wear a strapless with the top, but it was useful for placement. I took about an inch overall out of the circumference of the bodice initially, then went back and took out another 1 1/4 inches out of each side of the front, tapering to the existing seamlines at the band. As mentioned above, I am a bit chesty, but whoa did this pattern overcompensate. This means that that top now fits mostly snugly against my chest but since there aren't any darts or anything, it kind of reshapes my boobs in a way that they don't go naturally. (We're talking a lot about my boobs today. I hope that's ok with you. In this context, I'm ok with some over sharing.) Note to pattern drafters - boobs are curvy. The don't stick straight out from our chests like boxes. It would be nice if there were allowances made for "the girls" while still allowing the top to provide a bit of modesty. My bridesmaid's dress for my brother's wedding was exactly the same way. Fit great across the back, but I could have fit a whole other set of boobs in the front in addition to my own.

If I were to make it again, I would do all the things I mentioned above plus one more thing. This top has a centered back zipper. What kind of sadist puts a centered back zipper into a dress that ends at the middle of the back, right where no one can reach short of those freakishly flexible circus performers? And just think of the contortions I would have had to go through if I had put in a hook and eye! Anyway, next time I'm moving the zipper to the side seam.

I'm fairly happy with both of these things, though not ecstatic, hence the long time in talking about them. The top (aside from the fitting issues which are mostly resolved) is quite sweet and girly with the lacy edging. I'm learning to love my girly side, but I can only really feel comfortable in this top if I'm in the right mood. The sweater fits pretty well, but I wish I had made a bigger size. The rolled stockinette edging means that while it theoretically fits across the bust, it rolls open, and I feel more comfortable with more coverage.

Saturday, July 17, 2010

Lemons

You know, they have that saying about what to do when life gives you lemons. Well, it's been a challenging year, and with my lemons I made a lemon skirt.
I fell head over heels for this pattern by Alexander Henry. It's a quilting weight cotton, so the skirt is fully lined in muslin to prevent any unsightly back-lighting issues. This gives it a very nice weight and feel. I don't have the pattern available at the moment (more on that in a sec) but I'm pretty sure it's a New Look pattern, and in the original version, this is a mini skirt. I added two inches of length to make it hit just at the knee, and I also graded the pattern up a bit since it only goes to an 18 and I need a 20. I like this pattern because it has real jeans-style pockets and a substantial waistband. The thing I don't like about this pattern is that the skirt is very triangular and doesn't flow nicely. I'm looking for a swingy kind of skirt with a waistband. Anyone have any ideas?I also made this apron a while back. It's a twin to Danielle's apron, but this one took half as long to make. This is another quilting-weight cotton. I couldn't resist the kitschy fruit print. That's me pitting 3 quarts of sweet cherries. My hands look bloody right now, but these are destined to become Brandied Cherries. Speaking of low tech, I'm pitting those cherries with a hairpin, just like my great-great-Aunt Irma.

The other thing I did with lemons? I took charge of my life and made a decision. I am headed back to school in the fall to pursue a Masters of Library and Information Science degree at that other Michigan university. This means that I'm moving.

It's been a long journey to this place, where I'm deliberately heading my life in a direction different from the one I thought it would take. I'm an intensely practical person, and the truth is that even if the economy were not the way it is, and symphonies weren't cutting their personnel and season to the bone and beyond, music performance jobs are incredibly difficult to come by. I hope I will always be playing and teaching and taking auditions, but I also need health insurance and some stability and one day (maybe) my own home.

I don't think that anyone likes to move, but I am finding this to be a bit heart wrenching. I have loved living here more that I thought I ever would, but it's time to do those favorite things one last time and open my heart to the new favorite things that are to come.

Though I don't "officially" move until next Saturday, I took possession of my new place on Thursday. I drove down with a car load of stuff (including a box with all my sewing patterns in it), and set about deciding whether or not this place would be mine, or just a place to live. There are good signs. Preserves in the pantry.
And a tree outside my window.

Tuesday, July 6, 2010

Love a Long Weekend

This weekend I:
- went to the farmer's market
- had a long-ish run
- made iced tea (twice!)
- painted my toes "gunmetal" from Sally Hansen
- made Strawberry and Cinnamon Basil Popsicles
- watered my plants (often)
- got inspired to lift some weights. Should be inspired more often. Ouch.
- finished listening to "Harry Potter and the Deathly Hallows" on audiobook
- sewed. A lot.


This is the second thing I made. The first will wait for another post. I am absolutely thrilled with how it turned out. It was directly inspired by this dress Melissa made. When I saw this dress, I had one of those "gasp-step-back" reactions that happens occasionally when you find something that you absolutely adore. I loved the stripes, the pockets, and especially the way the bias-cut sides meant the stripes made as very flattering V with the princess seams. And the princess seams which work very well for my body type. The pattern is Simplicity 2591, and it fits reasonably well. Of course, liking something and fitting it to flatter are two different things, but this worked out just fine. The only thing I would change is to make the neckline smaller and the armholes a bit higher and narrower.
It's made from a cotton/poly blend in a white and grey stripe. It does actually make your eyes swim a bit in florescent light, as it appears to do in these pictures, though 98% of the time this is not an issue. To have fully copied Melissa, I would have needed a wider stripe, but we work with what we have. I followed the pattern exactly except for two things, both born of necessity. I did not interface the neckline facing. If I make it again, I will, but I had very, very little interfacing to begin with and I managed to cut two left back pieces instead of a left and a right back piece. Having no desire to go to the store, I ditched it. I also inserted an invisible zipper instead of doing a lapped zipper. It was so easy and painless, I may never use a lapped zipper again! Seriously. I have all this anxiety about zippers because I've never managed to do a lapped zipper that didn't look like an intermediate home sewer put it in, so I bit the bullet and brought out the invisible zipper foot. I'm so glad I did. No more anxiety! Plus, it just looks better.

Though there are a number of pieces to this pattern, it is not particularly difficult to sew. The handwork at the end took nearly as long as the machine work did. That is a hand-sewn hem my friends, and though it looks... um... unprofessional from the inside (apparently, it takes some higher form of education than I possess to iron in a straight line), it looks great on the outside! Next time I might try using hem tape instead of double folding the hem. There will be a next time, no doubt.

Tuesday, June 15, 2010

Sewing Presents

I didn't really mean to take a little blog break there, but that's the way the cookie crumbles.

Speaking of cookies, my friend Danielle had a birthday. I made her an apron because she gave me one for my birthday that I love, love, love. This was made off the Magic Pattern from Stitch Magazine Spring 2010. It was easy peasy to make aside from the bias tape, which I made from scratch. It was an adventure, and I ended up with double of what I needed, easily. Note to self, 1/2 yard of fabric makes a ton of bias tape. It's not hard, but it was my first time. Just one seam at the back neck and lots of bias tape edging. I did have to look up instructions for how to make the inside corners on the neckline, but this, too, was not hard - just a Google search on "bias tape inside corner."

I took direct inspiration from the photo in the magazine which featured a red floral print and red and white gingham edging. I fell in love with the photo from the first moment I saw it, and I fell in love with the apron the moment I put it on. It is super flattering, both on me and Danielle who are vastly different sizes and body types. The only change I made was to use the bias tape as the ties instead of using the ties the pattern instructs you to cut. I was having a lot of trouble turning them right side out so instead I edged just the skirt portion in bias tape, then cut a length long enough to edge the top and neck plus ties. Start in the middle at the top of the neck and do one side, then the other. It's really a good thing I bought fabric to make myself one, because I can see this "pattern" getting a lot of use.

Note also the Punch Brothers t-shirt I am wearing. Their newest CD is out in stores today, and I highly, highly recommend it. I was the lucky recipient of a special package which included the special edition package (CD, bonus CD, DVD, t-shirt, and signed cocktail recipe guide) for being one of the first 200 to pre-order the new album, and I've been listening to it on repeat for the past few days. They make me remember that I am first a musician.

I will be signing off for a few weeks as I make the rounds of the eastern US. Friends, family, what could be better? Cheers!

Monday, March 29, 2010

Sew

It's been a while since I've shown any sewing around here. It's not that I haven't been sewing, just that I've not really been excited about the things that I've finished. This one I'm calling the Blackberry Tunic. It's a Built By Wendy for Simplicity pattern. The tunic is made out of blackberry colored twill. The color is not accurate here - it's a wonderfully rich, deep purple. The color is the whole reason I chose this fabric. In retrospect, I probably should not have used twill. Twill is sticky in the sense that it wants to stick to itself and to everything else. Not ideal for a tunic that is meant to be worn over pants, plus every little bit of lint hanging around finds its way to the twill. It's a good thing I don't have any pets. The fit is very close, which means I can only feel comfortable wearing it sometimes. You know, when I'm feeling particularly svelte.

These are a set of 4 placemats and napkins I made based on the pattern in Bend the Rules Sewing. I love the fabrics I chose, but I think that they feel more homemade than handmade, if you know what I mean. You have to apply the contrast fabric first, then carefully stitch the ribbon around the outside. I found it nearly impossible to make the contrast fabric lay perfectly flat, so it bubbles a little on every placemat, and it was also impossible to make the ribbon edging perfectly square, which wouldn't have bothered me except that it is pretty obvious that the center isn't square in comparison to the square outside edges. For the napkins, I just made them as big as I could for the amount of fabric I bought instead of following the instructions in the book. I will use the set but they aren't especially company-worthy. I really liked lining the placemats with cotton flannel. It gives them a nice weight and structure without being inflexible. I'll definitely make more placemats and napkins, but I think next time I'll stick simple graphic prints and ditch the contrast fabric and ribbon.
This is my newest adventure. I bought the Built By Wendy Dresses book last week, and I highly recommend it. From three basic patterns (sheath, shift, and dirndl) she shows you how to make many, many different versions. First, though, you have to make sure that the basic pattern fits properly. I'm working on a sheath variant (the Workin' 9 to 5 dress) and this is my second muslin. I think I'm on track, but the alterations I'm making are a little more complicated than adding or subtracting from the side seams (which I've already done). I need to make the front of the bodice between the armholes smaller by about 3/4" on each side in order to eliminate some gapping in the neckline. I altered the seams manually, but now I'm just hoping that I can cut the original pattern appropriately so it fits right every time. So that I will have MY pattern. The one that fits ME. Oh, and I think I'll add a set of darts to the back and shorten the sleeves as well... It's my pattern. I can do what I want, right? I have some lovely mustard colored linen washed and ready to be cut. Here's hoping I'll have a new Easter dress!

Monday, January 12, 2009

New for the New Year

Pattern: Simplicity 4236
Fabric: some kind of cross between microfiber and very fine whale cord with a subtle pattern, plus rayon lining

For Christmas, my mom gave me a "gift certificate" for the materials for knitting or sewing project. I chose to make a skirt, since I have recently become slightly obsessed with dresses and skirts, and I can't find any I like is stores (particularly skirts). This skirt will be very warm with tights for the winter. It is fully lined, and I added a side pocket since I can barely go anywhere without my Burt's.

I ended up adding a extra seam up middle of the front and back. I didn't think to try on the skirt before putting in the zipper or the pocket, and it was quite big. A quick 5/8" seam down the front and back took care of the problem, and in this fabric is hardly noticeable.

It is very hard to tell in the picture, but the wall behind me has recently been painted "Quiet Waterfall" by Glidden. The color is exactly what I wanted - something quiet and muted but still present, and it does a good job of connecting some rather disparate color elements in my living and dining area.

It's going to be getting very cold around here, with highs in the single digits. Hopefully, I'll finish up some quick projects just in time for the cold snap!

Wednesday, March 12, 2008

Where has the time gone?

March 12th already? I feel like it's been ages since my last post. But I can't say I'm sorry that March is almost half over. I really dislike the month of March. By this time I'm usually about done with winter, and it's so grey and stormy and it seems like March just hangs around forever. I have, however, quite the little back-log of projects to show you.

First off, the striped yoke is done. Has been for more than a week yet, but I haven't blocked it. Honestly, I probably won't until next winter. I'm not likely to wear it in what's left of this winter. The fit is ok. It's kind of big, which I sort of planned and sort of didn't. Anyway, it satisfies my need for a weekend-y kind of sweater.

Yarn: Patons Classic Merino in Olive and Rich Red
Needles: US 7
Pattern: EZ Seamless Yoke

Last week, I was able to make use of my mom's sewing machine. I made this super cute tote bag with fabric I bought back in December. The dahlia print is a Liz Claibourne decorator fabric I got on clearance. The patter was from SEW: Sew Everything Workshop. I did some modifying to make sure I could use it for what I wanted, which was as a bag to hold all my teaching supplies: etude books, pencils, schedule, ect. It's really perfect, and I love the print. It's so retro and just speaks to me for some reason. The inside is a contrasting fabric in red-orange and I added an internal pocket in the dahlia print. I have a bunch of fabric left over, which has no particular plan. I bought way more than I needed because it was such a deal. I really want to use it. This print just makes me so happy!


The only thing I don't like about this tote is that the lining is too big. The pattern has you cut the lining and outside the exact same size. For me, this made a sloppy lining. It is settling into place now, but it's not perfect. I've found, having made three projects from this book, that I love the ideas, but the execution is not the best. First off, you need to be careful and check that seam allowances are included in the sizes you're told to cut so you end up with the size it says the project should be. This tote pattern has three options, and for one of the three, seam allowances are not included. Second, the styling on the projects makes them out to be more than they really are. Scale is an issue. Many objects look bigger or smaller than they actually are. And depsite what the finished object size says, it is hard to reconcile what you see with what the pattern says. I don't think I will be making any more projects directly out of this book. I will, however, take the suggested projects into consideration when buying patterns as a beginning sewer.

And last, I received my ATCs from the Project Spectrum swap.
Thanks a lot Kristen and Chandler!